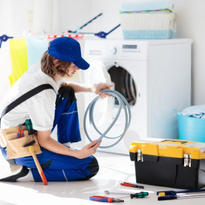
A noisy dryer can be more than just an annoyance—it can indicate a problem with the internal components. One of the most common culprits is worn-out dryer rollers. These rollers support the drum and allow it to rotate smoothly. Over time, they can wear out, leading to a noisy operation or even preventing the drum from turning at all. Fortunately, repairing dryer rollers is a task that many DIY enthusiasts can tackle. Here's a comprehensive guide to help you through the process.
Tools and Materials You'll Need
Before you start, gather the necessary tools and materials:
- Replacement dryer rollers
- Screwdrivers (Phillips and flat-head)
- Pliers
- Wrench set
- Putty knife
- Work gloves
- Vacuum cleaner or brush (to clean out lint)
Safety First
Safety should always be your top priority. Unplug the dryer from the power source before beginning any repairs. If your dryer is gas-powered, turn off the gas supply to avoid any leaks.
Step-by-Step Guide
1. Access the Drum
- Unplug the Dryer: Ensure the dryer is completely disconnected from the power source.
- Remove the Top Panel: Depending on your dryer model, you may need to use a putty knife to release clips holding the top panel in place. Lift the panel and set it aside.
- Detach the Control Panel: Unscrew and remove the control panel. Be sure to note how it is connected for reassembly.
- Remove the Front Panel: Unscrew the front panel. You may need to disconnect door switches or other wiring to fully remove the panel.
2. Remove the Drum
- Release the Belt: Locate the drive belt and carefully release it from the tension pulley and motor pulley.
- Extract the Drum: With the belt loose, you can now carefully lift the drum out of the dryer. Be mindful of any sharp edges inside the dryer cabinet.
3. Replace the Rollers
- Locate the Rollers: The rollers are typically located near the rear of the drum cavity. They are mounted on axles attached to the dryer frame.
- Remove the Old Rollers: Use a wrench or pliers to remove the nut or bolt securing each roller. Take note of any washers or spacers.
- Install the New Rollers: Place the new rollers onto the axles, ensuring any washers or spacers are reinstalled in the correct order. Secure the rollers with the nuts or bolts you removed earlier.
4. Reassemble the Dryer
- Reinstall the Drum: Carefully place the drum back into the dryer, ensuring it sits properly on the new rollers.
- Reattach the Belt: Loop the belt around the drum, tension pulley, and motor pulley as it was originally installed.
- Replace the Front Panel: Reconnect any wiring and secure the front panel with screws.
- Reattach the Control Panel: Ensure all connections are secure and screw the control panel back in place.
- Replace the Top Panel: Snap the top panel back into position.
5. Test the Dryer
- Plug In the Dryer: Reconnect the dryer to the power source and, if applicable, turn on the gas supply.
- Run a Test Cycle: Start the dryer and listen for any unusual noises. The new rollers should allow the drum to rotate smoothly and quietly.
Maintenance Tips
To prolong the life of your dryer rollers and keep your dryer running smoothly:
- Regularly Clean Lint Traps: Excess lint can cause unnecessary strain on the rollers and other components.
- Check the Belt: Inspect the drive belt periodically for signs of wear and replace it if necessary.
- Lubricate the Rollers: Some rollers may benefit from a light application of lubricant to reduce friction and wear.
Conclusion
Repairing dryer rollers is a manageable task that can save you the cost of a professional repair. By following these steps, you can ensure your dryer runs quietly and efficiently. Remember to always prioritize safety and consult your dryer’s manual for model-specific instructions. Happy repairing!A noisy dryer can be more than just an annoyance—it can indicate a problem with the internal components. One of the most common culprits is worn-out dryer rollers. These rollers support the drum and allow it to rotate smoothly. Over time, they can wear out, leading to a noisy operation or even preventing the drum from turning at all. Fortunately, repairing dryer rollers is a task that many DIY enthusiasts can tackle. Here's a comprehensive guide to help you through the process.
Tools and Materials You'll Need
Before you start, gather the necessary tools and materials:
- Replacement dryer rollers
- Screwdrivers (Phillips and flat-head)
- Pliers
- Wrench set
- Putty knife
- Work gloves
- Vacuum cleaner or brush (to clean out lint)
Safety First
Safety should always be your top priority. Unplug the dryer from the power source before beginning any repairs. If your dryer is gas-powered, turn off the gas supply to avoid any leaks.
Step-by-Step Guide
1. Access the Drum
- Unplug the Dryer: Ensure the dryer is completely disconnected from the power source.
- Remove the Top Panel: Depending on your dryer model, you may need to use a putty knife to release clips holding the top panel in place. Lift the panel and set it aside.
- Detach the Control Panel: Unscrew and remove the control panel. Be sure to note how it is connected for reassembly.
- Remove the Front Panel: Unscrew the front panel. You may need to disconnect door switches or other wiring to fully remove the panel.
2. Remove the Drum
- Release the Belt: Locate the drive belt and carefully release it from the tension pulley and motor pulley.
- Extract the Drum: With the belt loose, you can now carefully lift the drum out of the dryer. Be mindful of any sharp edges inside the dryer cabinet.
3. Replace the Rollers
- Locate the Rollers: The rollers are typically located near the rear of the drum cavity. They are mounted on axles attached to the dryer frame.
- Remove the Old Rollers: Use a wrench or pliers to remove the nut or bolt securing each roller. Take note of any washers or spacers.
- Install the New Rollers: Place the new rollers onto the axles, ensuring any washers or spacers are reinstalled in the correct order. Secure the rollers with the nuts or bolts you removed earlier.
4. Reassemble the Dryer
- Reinstall the Drum: Carefully place the drum back into the dryer, ensuring it sits properly on the new rollers.
- Reattach the Belt: Loop the belt around the drum, tension pulley, and motor pulley as it was originally installed.
- Replace the Front Panel: Reconnect any wiring and secure the front panel with screws.
- Reattach the Control Panel: Ensure all connections are secure and screw the control panel back in place.
- Replace the Top Panel: Snap the top panel back into position.
5. Test the Dryer
- Plug In the Dryer: Reconnect the dryer to the power source and, if applicable, turn on the gas supply.
- Run a Test Cycle: Start the dryer and listen for any unusual noises. The new rollers should allow the drum to rotate smoothly and quietly.
Maintenance Tips
To prolong the life of your dryer rollers and keep your dryer running smoothly:
- Regularly Clean Lint Traps: Excess lint can cause unnecessary strain on the rollers and other components.
- Check the Belt: Inspect the drive belt periodically for signs of wear and replace it if necessary.
- Lubricate the Rollers: Some rollers may benefit from a light application of lubricant to reduce friction and wear.
Conclusion
Repairing dryer rollers is a manageable task that can save you the cost of a professional repair. By following these steps, you can ensure your dryer runs quietly and efficiently. Remember to always prioritize safety and consult your dryer’s manual for model-specific instructions. Happy repairing!

Comments (10)
I was impressed by how quickly Bit Appliance Repair fixed my washer dryer. Highly recommend their service!
I was blown away by the level of professionalism and expertise displayed by their team during my recent washer dryer repair service. Not only did they fix the issue quickly and efficiently, but they also provided helpful tips for maintaining my appliances in the future. I'm incredibly impressed and grateful for their excellent service!
I was in a bind when my washer dryer stopped working unexpectedly, but thankfully, I found them. Their same-day repair service was a lifesaver, and their technicians were friendly, courteous, and skilled. They took the time to explain the issue and the repair process, putting my mind at ease. I wouldn't hesitate to use their services again.
I recently used their washer dryer repair service, and I couldn't be happier with the results. Their technicians were prompt, courteous, and incredibly skilled, and they had my appliances back up and running in no time. Their attention to detail and commitment to customer satisfaction are truly commendable. I highly recommend their services!
I recently had the pleasure of using their washer dryer repair service, and I must say, I'm thoroughly impressed. From the moment I contacted them, their customer service was exceptional, and their technicians were knowledgeable and efficient in diagnosing and fixing the issue. I highly recommend their services to anyone in need of washer dryer repair!
Bit Appliance Repair's technicians are skilled and courteous. I'm grateful for their quick washer dryer repair service.
Bit Appliance Repair's technicians are miracle workers! My washer dryer is working like new again thanks to them.
Their washer dryer repair service is hands down the best in town. Not only were their technicians prompt and professional, but they also went above and beyond to ensure that my appliances were working perfectly. I'm incredibly impressed with the quality of their work and would highly recommend them to anyone in need of appliance repair.
Their washer dryer repair service exceeded all my expectations. Their technicians were professional, courteous, and knowledgeable, and they went above and beyond to ensure that my appliances were working perfectly. I'm incredibly impressed with their level of expertise and would definitely use their services again in the future.
Their washer dryer repair service exceeded all my expectations. Their technicians were professional, courteous, and knowledgeable, and they went above and beyond to ensure that my appliances were working perfectly. I'm incredibly impressed with their level of expertise and would definitely use their services again in the future.